

How to Do a Cartwheel: Step-by-Step for Beginners

You’ve seen someone nail a cartwheel and thought, no way I can do that without crashing. But you can. It doesn’t matter if you’re “gymnastic” or young, learning how to do a cartwheel is not related to either. It’s mostly about timing, balance, and knowing how to shift your weight.
I’ve taught kids, teens, and adults, people who thought they were “too stiff” or “too old.” They all managed it eventually. Let’s break it down if you have some space and a floor that won’t harm your wrists.
What Is a Cartwheel, Anyway?
A cartwheel is a lateral rotation, similar to what would happen if you rolled your body along an unseen axis and used your hands as the pivot. You begin standing upright, then your legs follow through, and for a short while, you are inverted with your arms and legs stretched out like the ribs of a wheel.
It is easy after you get the timing, but your first few attempts will probably be more like clumsy lunges. That is typical.

Step 1: Always Warm Up First
Trust me, cold wrists and tight hamstrings will ruin your progress fast. Move your joints for at least five minutes. Do little jogging in place, arm circles, and hip rolls. Nothing fancy, just get your blood moving.
| Stretch | Time | Helps With |
|---|---|---|
| Wrist rolls | 30 sec | Hand stability |
| Shoulder rotations | 30 sec | Upper-body mobility |
| Lunges | 1 min | Hip flex and balance |
| Side bends | 1 min | Core control |
| Jumping jacks | 1 min | Energy and rhythm |

Step 2: Find Your Starting Side
Choose a side, left or right. Most right-handed people like to start with their left leg, but it’s not a requirement. You’ll find what feels natural. Stand tall, feet apart a little, one leg slightly in front. Keep your arms straight up beside your ears. You should feel like you’re about to dive sideways.
Step 3: Breaking Down the Motion
Here’s the part that everyone rushes. Don’t. The trick to learning fast is slowing it down.
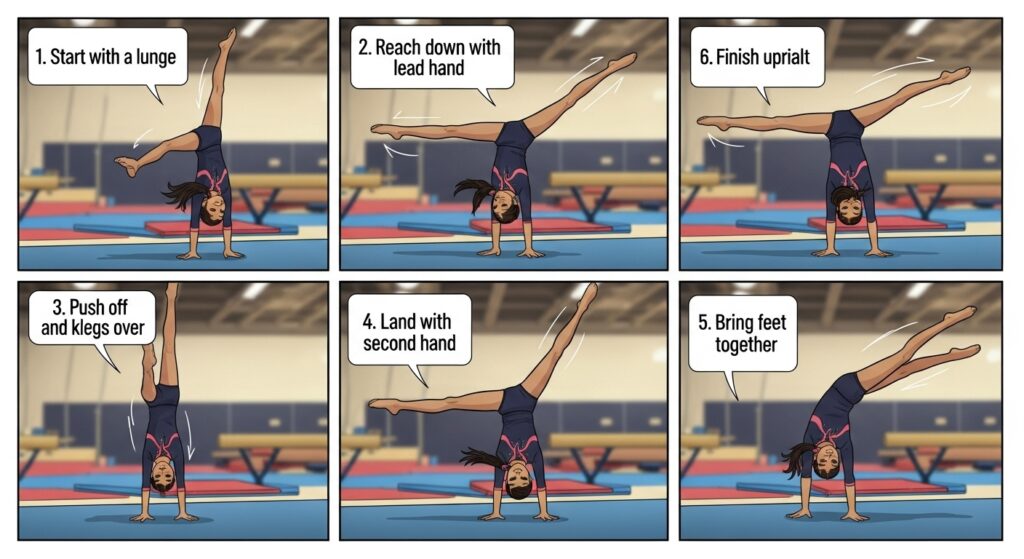
- Step forward on your lead leg.
- Lean forward and reach for the floor.
- Place your front hand down first.
- Kick your back leg up high, then let the other leg follow.
There’s a second where your body forms an upside-down “V.” That’s your mid-cartwheel. Then your second hand touches down, and you rotate the rest of the way. You’ll land facing the opposite direction, which always feels strange the first few times.
A Quick Reality Check
The majority of people tend to look at their feet. But you shouldn’t. Focus on your hands as they make contact with the ground. This helps to maintain your spine in line and your weight where it is supposed to be. Moreover, don’t just jump at it. Give it a good kick. There is a huge difference between the two.
Step 4: Balance and Coordination Practice
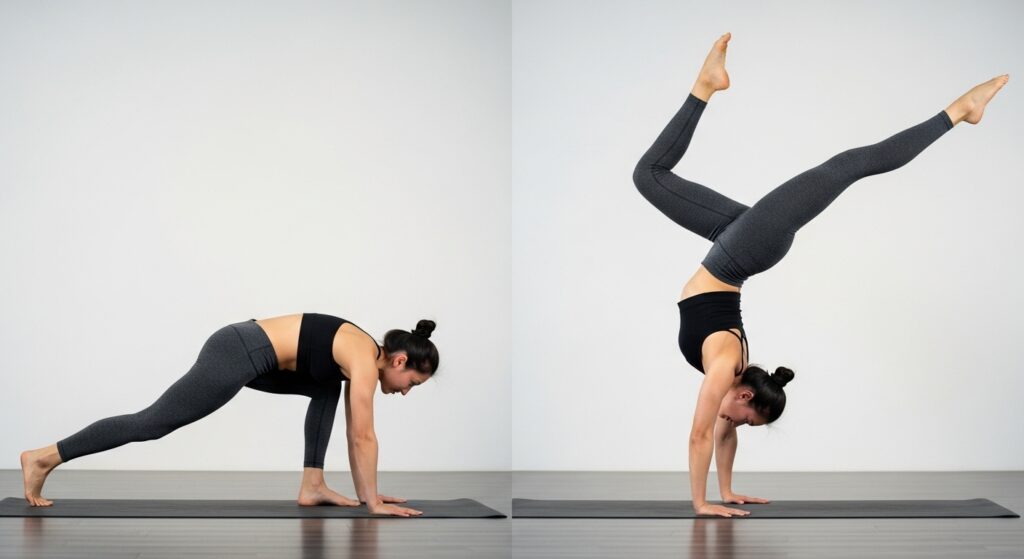
If you’re still nervous about going fully upside down, practice partial moves. Handstands against a wall are great. They teach you how your arms hold your body and how to stay tight through your core.
| Exercise | Goal |
|---|---|
| Wall handstands | Wrist strength |
| Lateral kicks | Leg coordination |
| Half-cartwheels | Controlled motion |
| Shoulder shrugs | Stability |

Step 5: Body Positioning Matters
Good form is the secret. Straight arms, straight legs, wide “V” shape when you’re up there. Point your toes, not for looks, but because it makes your whole body align better. Keep your stomach tight. If your core goes loose, the rest of you flops around.
Step 6: Nail the Landing
Most people trip over this part (literally). You’ll probably land sideways or fall the first few times. That’s fine. Focus on landing one foot at a time. Same order as your takeoff, but reversed. If you’re losing balance, slow down. Sometimes videoing yourself helps, you can catch what you’re doing wrong faster that way.
Step 7: Mistakes That Keep You Stuck
Here’s what I see over and over:
- Bent elbows
- Looking sideways instead of down
- Jumping instead of swinging
- Both feet landing together
- Forgetting to warm up
Change only one thing in your work with the clone. Perfectly doing half a cartwheel ten times is better than doing a full one badly twenty times.
Step 8: Keep a Simple Routine
Practice daily, if possible. Ten minutes daily is more effective than one hour weekly. Possess a general conception of your intended actions.
| Day | Focus | Time |
|---|---|---|
| Monday | Half-cartwheels + warm-up | 15 min |
| Tuesday | Full cartwheels | 20 min |
| Wednesday | Landing drills | 15 min |
| Thursday | Stretch day | 10 to 15 min |
| Friday | Flow practice | 20 min |
And yeah, don’t do it on concrete. Grass or mats only.

Step 9: Getting Comfortable
Once you stop overthinking, your body starts remembering the rhythm. That’s the turning point. You’ll feel less “I’m going to fall” and more “I know where my legs are.” Try different paces. Slow, fast, with music even. It helps with timing.
If you’re helping a kid, use tape or chalk on the floor so they know where hands and feet go. Simple, visual, works every time.
Step 10: Add Fun Variations
When the regular cartwheel feels easy, play around with these:
- One-handed cartwheel
- Cartwheel into a handstand pause
- Over a pillow or foam block
Each one teaches control in a new way.
Practice at Home: How to Do a Cartwheel
Clear some space. Mark a straight line with tape and use it to track where your hands land. Try small improvements, higher kicks, smoother motion. Keep your body relaxed through every turn. The moment you stiffen up, your movement stops flowing.
Some easy home drills:
- Side kicks in front of a mirror
- Shoulder warm-ups with a band
- Hand placement on a mat
- Slow, low cartwheels
Adults, Don’t Skip This Part
Adults tend to think cartwheels are for kids. Not true. It’s one of the best full-body mobility drills out there. If your shoulders or hips are tight, take it easy. Warm up extra. Stretch daily. Yoga helps a ton. Downward Dog and Warrior poses are perfect prep.
Staying Relaxed While You Learn
This portion of the game is mostly psychological. Avoid shutting down. If you are too nervous, your actions will be abrupt. Keep relaxed, let your body do what it naturally is. It is very likely that you will be making mistakes quite a lot. That’s what everyone is. The change for the better is actually what you have in-between those uncoordinated, faltering tries.
Safety First
- Use a mat or soft ground.
- Keep hair tied up.
- Barefoot is better, grip matters.
- Rest if you feel dizzy or sore.
- Always stretch before and after.
People Also Ask
1. How long does it take to learn a cartwheel?
Usually about a week or two if you practice daily. Some need more time, and that’s fine.
2. Can adults learn?
Yes. You just need patience and consistent practice. Flexibility helps but isn’t required.
3. What if I’m scared to go upside down?
Start small, use a wall or a friend for support. You’ll get used to it.
4. Do I need to be flexible first?
A little flexibility helps, but it’s not a dealbreaker. Warm up before every session.
5. How do I fix my form?
Film yourself or use a mirror. Watch your hand placement and leg line. Adjust slowly.

I’m Benjamin Clark, dedicated to elevating your athletic performance. Get targeted fitness plans, injury prevention techniques, sports psychology insights, and the latest in nutrition. Let’s train smarter.